Over the weekend Sean went out and bought not only Madden 13, but also Grand Theft Auto for his PlayStation. Not only have I completely lost him to 3 fantasy football leagues, but now I've lost him to 2 video games that he absolutely loves. Since he's been either playing games or looking up player news, I've been keeping myself busy by making more pieces of jewelry.
Having to take jewelry back and forth from places, I needed a way to take them around without destroying them because trust me keeping them disorganized in a box and having that box fall broke all of my necklaces and bracelets way too many times. I also didn't want to spend a ton of money on a jewelry tray and then have to spend more money on the liners every time I needed more. I decided to use a Louis Vuitton box that I've have laying around for years (without actually ever owning a Louis Vuitton purse) and create my own Jewelry Tray and Liners. It took me a couple hours start to finish. The best part was that it didn't cost me an arm and a leg because the only thing I had to pay for was the fabric and batting. I got over 10 liners for my box, but it all really depends on the length and width of your box. Don't have jewelry or need new ones to wear, check out how to make your own like my Black Natural Stone with Chain Necklace, Yellow Floral Necklace, Floral Pearl Necklace or a Chain and Pearl Necklace.
Here's What You Need
Cardboard (I used some that I had lying around)
An empty box
Felt fabric (I used 1 yard which was a couple bucks)
Low Loft Quilt batting (I used 1 yard)
Sewing pins or any kind to hold your jewelry in place
Ribbon
Construction paper (optional)
Stapler
Hot glue gun and a glue stick
1. Start with cutting your cardboard about 1/2 an inch to 1 inch smaller than the length and width of your box (this really depends on how thick you want your batting to be)
2. Cut batting twice the length of your cardboard. Fold batting in half and staple onto cardboard.
3. If you don't want the back of your trays to be cardboard, now would be the time to use a glue stick and glue construction paper to the back.
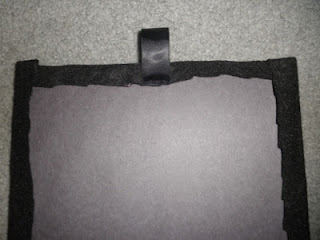
4. Next step is to cut the felt. Cut it so that it is larger than the cardboard and you have enough to be able to glue it down on the back of the tray. If you want it to be neat and clean, cut it so you have enough the fold the ends and glue it down. I didn't care or have enough patience and left it jagged and uneven.
5. Using the hot glue gun, wrap the fabric over the edges and glue down.
5. Cut ribbon into 3 inch strips and fold in half. Using the hot glue gun, glue the ends together.
6. Glue ribbon onto back of tray.
7. Use pins to hold your jewelry in place and push until it slightly goes through the cardboard. And keep all your necklaces and bracelets neat and in place :)
Looking for jewelry to store on your new tray liners?
 |
| DIY Floral Pearl Necklace |
 |
| DIY Black Stone Necklace |
 |
| DIY Multi Chain and PendantNecklace |


No comments:
Post a Comment